If you’re a Chromebook user, take a screenshot on Chromebook can be incredibly helpful in capturing what’s on your screen for later reference or sharing with others. However, you may not be familiar with the different ways to take screenshots on your Chromebook. In this article, we’ll explore 11 different ways to take a screenshot on your Chromebook, from the most basic methods to more advanced techniques.
Table of Contents
- Introduction
- Why Take Screenshots on Chromebook?
- Basic Screenshot Methods
- Method 1: Capture the Entire Screen
- Method 2: Capture a Specific Window
- Method 3: Capture a Part of the Screen
- Advanced Screenshot Methods
- Method 4: Use a Keyboard Shortcut
- Method 5: Use the Power and Volume Down Buttons
- Method 6: Use the Accessibility Menu
- Method 7: Use the Chrome Browser’s Developer Tools
- Method 8: Use a Third-Party Extension
- Editing Screenshots on Chromebook
- Method 9: Use the Built-In Editor
- Method 10: Use a Third-Party Editor
- Sharing Screenshots on Chromebook
- Method 11: Share Directly from the Screenshot
- Conclusion
- FAQs
Introduction
Taking a screenshot is a useful tool for anyone using a computer, and Chromebooks are no exception. Whether you’re working on a school project, creating a presentation, or troubleshooting an issue with tech support, a screenshot can often help to clarify the situation. In this article, we’ll look at 11 ways to take a screenshot on your Chromebook, ranging from simple methods that anyone can use to more advanced techniques that require a bit more know-how.
Read More: How to Disable Websites in Google Chrome for Mobile in 2023
Why Take Screenshots on Chromebook?
There are many reasons why you might want to take a screenshot on your Chromebook. Here are a few examples:
- To capture an error message or other important information to share with tech support.
- To take a snapshot of a web page or application for use in a presentation or report.
- To record a step-by-step tutorial or guide.
- To capture a funny or interesting moment to share on social media.
Whatever your reason for taking a screenshot, it’s important to know the different methods available to you. Let’s take a look at some of the basic methods first.
Basic Screenshot Methods
Capture the Entire Screen
The simplest way to take a screenshot on your Chromebook is to capture the entire screen. To do this, press the Ctrl + Show windows keys at the same time. The Show windows key is typically located in the top row of the keyboard, next to the brightness and volume keys.
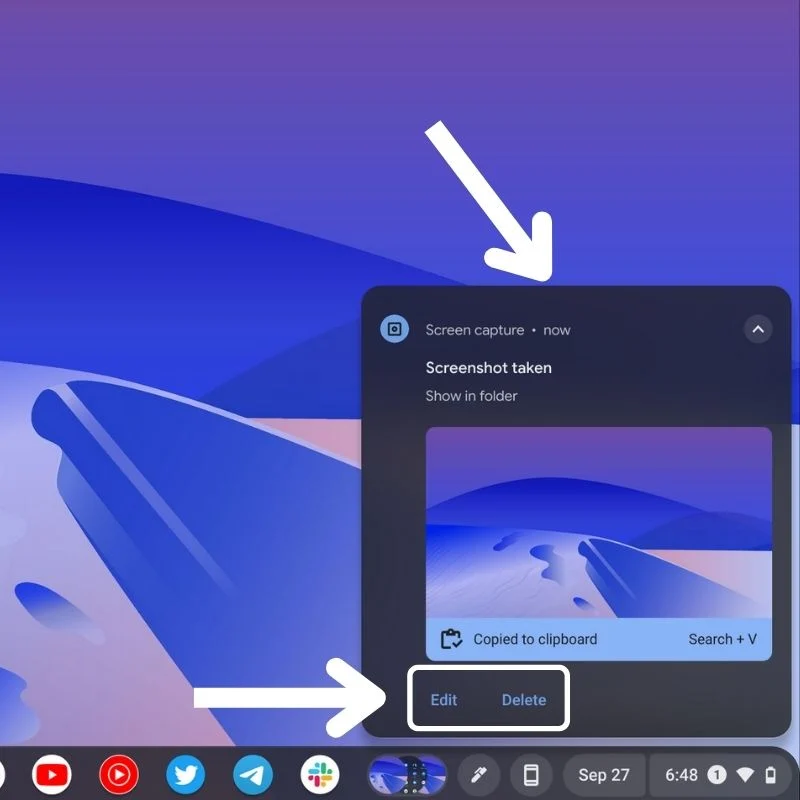
When you press these keys together, your Chromebook will take a screenshot of the entire screen and save it to the Downloads folder. You can also view the screenshot by clicking the notification that appears in the bottom right corner of your screen.
Capture a Specific Window
If you only want to capture a specific window or application, you can use a different keyboard shortcut. First, click on the window you want to capture to make it active. Then, press Ctrl + Shift + Show windows at the same time.
This will take a screenshot of the active window and save it to the Downloads folder. Again, you can view the screenshot by clicking the notification that appears in the bottom right corner of your screen.


Capture a Part of the Screen
Sometimes you may only want to capture a small portion of the screen. To do this, press Ctrl + Shift + Partial screenshot.
This will change your cursor to a crosshair, which you can use to select the area of the screen you want to capture. Click and drag your mouse to select the portion of the screen you want to capture, then release the mouse button.
Your Chromebook will then save the screenshot to the Downloads folder, and you can view it by clicking the notification that appears in the bottom right corner of your screen.
Advanced Screenshot Methods
While the basic screenshot methods are useful, there are more advanced techniques that can save you time and effort. Let’s take a look at some of these now.
Use a Keyboard Shortcut
If you take screenshots frequently, you may find it easier to use a keyboard shortcut. To set up a custom keyboard shortcut for taking screenshots, follow these steps:
- Click on the time in the bottom right corner of your screen.
- Click on the gear icon to open the Settings menu.
- Scroll down and click on “Device” and then “Keyboard”.
- Scroll to the bottom of the page and click on “Custom shortcuts”.
- Click on the “+” icon to create a new shortcut.
- Enter a name for the shortcut (e.g. “Screenshot”) and the command “screenshot”.
- Click on “Set shortcut” and press the keys you want to use for the shortcut (e.g. Ctrl + Alt + S).
- Click “OK” to save the shortcut.
Now you can use your custom keyboard shortcut to take screenshots quickly and easily.
Read More: How to Split Screen on Chromebook [5 Easy Ways]
Use the Power and Volume Down Buttons
If you have a Chromebook with a touch screen, you can take a screenshot by pressing the power and volume-down buttons at the same time. This method is similar to taking a screenshot on a smartphone or tablet.
When you press these buttons together, your Chromebook will take a screenshot and save it to the Downloads folder. You can view the screenshot by clicking the notification that appears in the bottom right corner of your screen.
Use the Accessibility Menu
The Accessibility menu on your Chromebook includes a feature called “Take a screenshot”. To use this feature, follow these steps:
- Click on the time in the bottom right corner of your screen.
- Click on the gear icon to open the Settings menu.
- Scroll down and click on “Accessibility”.
- Click on “Manage accessibility features”.
- Scroll down and toggle on “Take a screenshot”.
Now, when you press the Search and Refresh keys at the same time, your Chromebook will take a screenshot and save it to the Downloads folder.
Use the Chrome Browser’s Developer Tools
If you’re a developer or web designer, you may already be familiar with the Chrome browser’s Developer Tools. These tools also include a feature for taking screenshots of web pages.
To use this feature, open the web page you want to capture and open the Developer Tools (press Ctrl + Shift + I on your keyboard). Then, click on the three dots in the top right corner of the Developer Tools window and select “More tools” > “Capture screenshot”.
This will take a screenshot of the entire web page and display it in a new tab. You can save the screenshot by right-clicking on it and selecting “Save image as”.
Use a Third-Party Extension
If you need more advanced screenshot features than those built into Chrome OS, you can use a third-party extension from the Chrome Web Store.
There are many different extensions available, but some popular options include Lightshot
and Nimbus Screenshot & Screen Video Recorder. These extensions allow you to capture screenshots with more options, such as annotating the image, blurring parts of the image, and capturing specific parts of the screen.
To install a third-party extension, follow these steps:
- Open the Chrome Web Store in your Chromebook’s browser.
- Search for the extension you want to install (e.g. “Lightshot”).
- Click on the “Add to Chrome” button next to the extension’s listing.
- Click on “Add extension” in the pop-up window.
The extension will now be installed and you can access its features by clicking on its icon in the Chrome browser’s toolbar.
Use a Web App
If you don’t want to install an extension, you can use a web app to take screenshots on your Chromebook. One popular option is the web app called “Webpage Screenshot”.
To use this app, follow these steps:
- Open the “Webpage Screenshot” website in your Chromebook’s browser.
- Enter the URL of the web page you want to capture.
- Choose the type of screenshot you want to take (e.g. full page, visible area, or selection).
- Click on the “Capture” button.
- Wait for the screenshot to be taken and displayed on the page.
You can then save the screenshot by right-clicking on it and selecting “Save image as”.
Use a USB-C Hub or Dock
If you have a Chromebook with a USB-C port, you can use a USB-C hub or dock to connect a mouse, keyboard, and other peripherals. Some USB-C hubs and docks also include HDMI or DisplayPort ports, which allow you to connect an external display.
To take a screenshot with an external display, follow these steps:
- Connect your Chromebook to the external display using a USB-C hub or dock.
- Press the Ctrl key and the window switcher key (the key with the rectangle and two lines) at the same time.
- Your Chromebook will take a screenshot of the entire display (including the external display) and save it to the Downloads folder.
Use Google Drive
If you use Google Drive to store your files, you can also use it to take and store screenshots. To do this, follow these steps:
- Open Google Drive in your Chrome browser.
- Click on the “New” button and select “File upload”.
- Navigate to the image you want to upload (e.g. a screenshot you’ve already taken) and click “Open”.
- Once the file is uploaded, right-click on it and select “Open with” > “Google Slides”.
- In Google Slides, click on the “File” menu and select “Download” > “PNG image”.
This will download the screenshot as a PNG file, which you can then use or share as needed.
Conclusion
Taking screenshots on a Chromebook is easy and there are many different methods to choose from. Whether you prefer to use a keyboard shortcut, a touch screen, or a third-party app, there’s a method that will work for you. By using these tips, you’ll be able to take screenshots quickly and easily, and capture exactly what you need.
FAQs
- What is the easiest way to take a screenshot on a Chromebook?
- The easiest way is to press the Ctrl and Window Switcher keys at the same time.
- Can I use a keyboard shortcut to take screenshots on a Chromebook?
- Yes, you can create a custom keyboard shortcut for takingscreenshots on a Chromebook.
- How do I take a screenshot of a specific area on a Chromebook?
- You can use the built-in screenshot tool or a third-party extension to select a specific area of the screen to capture.
- Can I use a touch screen to take screenshots on a Chromebook?
- Yes, you can use the touch screen to take screenshots by pressing the power and volume-down buttons at the same time.
- Do I need to install any software to take screenshots on a Chromebook?
- No, you can take screenshots using the built-in screenshot tool or by using a keyboard shortcut. However, if you want to use advanced screenshot features, such as adding annotations and comments, you may need to install a third-party extension or app.


2 Comments