Do you want to know how to record your screen on a Chromebook? As more and more people are using Chromebooks for work, school, and entertainment, screen recording has become an essential feature. Whether you want to create a tutorial, record a video call, or capture a gameplay moment, screen record on chromebook can help you achieve it. In this article, we’ll show you six easy and efficient ways to record your screen on a Chromebook in 2023.
Table of Contents
- Introduction
- Built-in Screen Recorder
- Loom
- Screencastify
- Nimbus Screenshot & Screen Video Recorder
- CloudApp
- Camtasia
- Conclusion
- FAQs
Introduction
Chromebooks are lightweight, affordable, and efficient laptops that run on the Chrome operating system. They are popular among students, teachers, and remote workers for their simplicity, speed, and security. However, one of the drawbacks of Chromebooks is the limited availability of software applications, especially when it comes to screen recording. Fortunately, there are several ways to record your screen on a Chromebook, and most of them are free and easy to use. In this article, we’ll explore six ways to record your screen on a Chromebook, from built-in options to third-party tools.

Built-in Screen Recorder
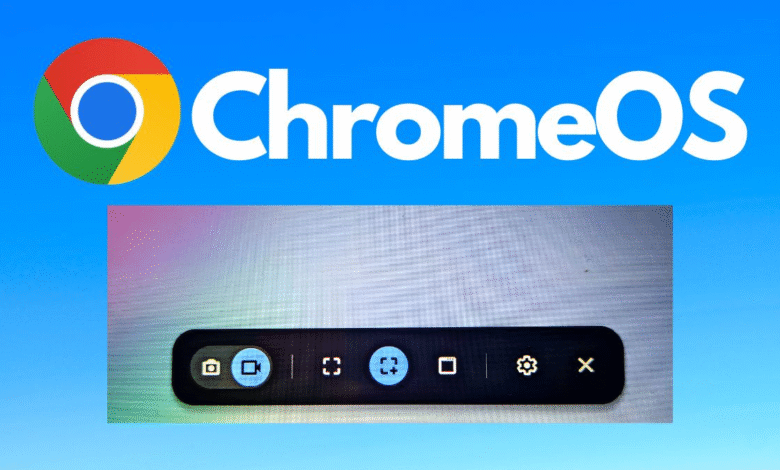
If you have a newer Chromebook model with Chrome OS 89 or higher, you can use the built-in screen recorder to capture your screen and audio. Here’s how:
- Open the app or webpage you want to record.
- Press the Ctrl + Shift + Show windows keys simultaneously. The Show windows key is located on the top row, between the Full screen and Brightness down keys.
- Select Record screen from the pop-up menu.
- Choose the area of your screen you want to record: Full screen or Select area.
- Choose whether to record audio: No audio, Microphone, or System audio.
- Click Record to start recording.
- Click Stop to stop recording.
- Your screen recording will be saved in the Downloads folder as a .webm file.
The built-in screen recorder is a convenient and reliable option for basic screen recording needs. However, it has some limitations, such as no editing features, no webcam recording, and no annotations.
Loom
Loom is a popular screen recording tool that works seamlessly with Chromebooks. It offers a free plan with unlimited recording time and basic editing features, as well as a paid plan with more advanced features. Here’s how to use Loom on a Chromebook:
- Install the Loom Chrome extension from the Chrome Web Store.
- Click on the Loom icon in the top-right corner of your Chrome browser.
- Sign up for a free Loom account or log in if you already have one.
- Choose whether to record your webcam, screen, or both.
- Choose whether to record audio from your microphone, system, or both.
- Click Start recording to begin.
- Click Stop recording when you’re done.
- Edit your video by trimming, cropping, or adding captions and emojis.
- Share your video via a Loom link or download it as an MP4 file.
Loom is a great option for quick and easy screen recording, especially if you need to share your video with others. Its editing features are intuitive and fun, and its integration with Chrome is seamless.
Screencastify
Screencastify is another popular screen recording tool that is compatible with Chromebooks. It offers a free plan with 5 minutes of recording time per video and a premium plan with unlimited recording time and more advanced features. Here’s how to use Screencastify on a Chromebook:
- Install the Screencastify Chrome extension from the Chrome Web Store.
- Click on the Screencastify icon in the top-right corner of your Chrome browser.
- Sign up for a free Screencastify account or log in if you already have one.
- Choose whether to record your webcam, screen, or both.
- Choose whether to record audio from your microphone, system, or both.
- Click Record to start recording.
- Click Stop to stop recording.
- Edit your video by trimming, adding annotations, or merging clips.
- Share your video via a Screencastify link, Google Drive, or YouTube.
Screencastify is a versatile and user-friendly screen recording tool that is ideal for educators, business professionals, and content creators. Its editing features are robust and customizable, and its sharing options are seamless.
Read More: Way to Fix Google Chrome Translate Not Working (2023)


Nimbus Screenshot & Screen Video Recorder
Nimbus Screenshot & Record Your Screen on a Chromebook is a feature-packed screen recording tool that works well with Chromebooks. It offers a free plan with basic features and a premium plan with more advanced features. Here’s how to use Nimbus Screenshot & Screen Video Recorder on a Chromebook:
- Install the Nimbus Screenshot & Screen Video Recorder Chrome extension from the Chrome Web Store.
- Click on the Nimbus Screenshot & Screen Video Recorder icon in the top-right corner of your Chrome browser.
- Sign up for a free Nimbus account or log in if you already have one.
- Choose whether to record your webcam, screen, or both.
- Choose whether to record audio from your microphone, system, or both.
- Click Record to start recording.
- Click Stop to stop recording.
- Edit your video by adding annotations, text, or shapes.
- Share your video via a Nimbus link, Google Drive, or Dropbox.
Nimbus Screenshot & Screen Video Recorder is a powerful and customizable screen recording tool that is suitable for both personal and professional use. Its editing features are robust and creative, and its sharing options are versatile.
CloudApp
CloudApp is a comprehensive Record Your Screen on a Chromebook and sharing tool that is compatible with Chromebooks. It offers a free plan with basic features and a premium plan with more advanced features. Here’s how to use CloudApp on a Chromebook:
- Install the CloudApp Chrome extension from the Chrome Web Store.
- Click on the CloudApp icon in the top-right corner of your Chrome browser.
- Sign up for a free CloudApp account or log in if you already have one.
- Choose whether to record your webcam, screen, or both.
- Choose whether to record audio from your microphone, system, or both.
- Click Record to start recording.
- Click Stop to stop recording.
- Edit your video by adding annotations, captions, or GIFs.
- Share your video via a CloudApp link, Slack, or email.
CloudApp is an all-in-one screen recording and sharing tool that is ideal for remote teams, customer support, and social media. Its editing features are intuitive and dynamic, and its sharing options are seamless and integrated.
Camtasia
Camtasia is a professional-grade screen recording and video editing software that is compatible with Chromebooks via the Android app. It offers a free trial and a paid plan with advanced features. Here’s how to use Camtasia on a Chromebook:
- Install the Camtasia Android app from the Google Play Store.
- Open the Camtasia app and choose whether to record your screen or camera.
- Choose whether to record audio from your microphone, system, or both.
- Click Record to start recording.
- Click Stop to stop recording.
- Edit your video by trimming, adding annotations, or merging clips.
- Share your video via Google Drive, YouTube, or other platforms.
Camtasia is a professional and comprehensive screen recording and video editing software that is ideal for e-learning, training, and marketing. Its editing features are advanced and sophisticated, and its sharing options are customizable and versatile.
Read More: How to Split Screen on Chromebook [5 Easy Ways]
Conclusion
Recording your screen on a Chromebook is essential for various reasons, such as creating tutorials, recording meetings, or sharing gameplay. Fortunately, there are numerous screen recording tools that are compatible with Chromebooks, including Loom, OBS Studio, Screencastify, Nimbus Screenshot & Screen Video Recorder, CloudApp, and Camtasia. Each tool has its unique features, benefits, and limitations, so it’s crucial to choose the one that best fits your needs and preferences. By using any of these screen recording tools, you can easily and effectively Record Your Screen on a Chromebook and enhance your productivity, creativity, and communication.
FAQs
- Do I need a high-end Record Your Screen on a Chromebook? No, you don’t need a high-end Chromebook to record your screen. Most Chromebooks can handle basic screen recording tasks without any issues.
- Are screen recording tools free or paid? There are both free and paid screen recording tools available for Chromebooks. It depends on the tool’s features, limitations, and pricing.
- Can I record my webcam and screen simultaneously? Yes, most screen recording tools allow you to record your webcam and screen simultaneously. Some tools also let you switch between different camera angles or sources.
- Can I edit my recorded videos after recording them? Yes, most screen recording tools offer basic or advanced video editing features, such as trimming, adding annotations, captions, or effects, and merging or splitting clips.
- Can I share my recorded videos with others? Yes, most screen recording tools offer various sharing options, such as sharing via a link, Google Drive, Dropbox, or social media, or exporting to a video format such as MP4, AVI, or MOV.


One Comment